
Customer Support
support@countrysidequilts.com
support@countrysidequilts.com

Welcome back to the blog! Whether you’re a regular listener of the Countryside Experience Podcast or you’ve just popped in to solve a specific sewing snag, we’re glad you’re here. Before we dive into the nuts and bolts of machine maintenance, a little bit about us: the Countryside Experience Podcast is our main platform for sharing the love of all things handmade, and it is proudly sponsored by Countryside General Stores LLC. Under that umbrella, we operate our retail home, Countryside Quilts™, where we live and breathe fabric, thread, and longarm quilting.
If you’ve ever sat down at your machine ready to create something beautiful, only to have the thread bunch up into a "bird's nest" or the needle snap in half, you know how frustrating it can be. We’ve all been there: usually when we’re in a rush to finish a gift! Today, we’re going to walk through the seven most common mistakes quilters and sewists make with their machines and, more importantly, how you can fix that dreaded tension issue in a heartbeat.
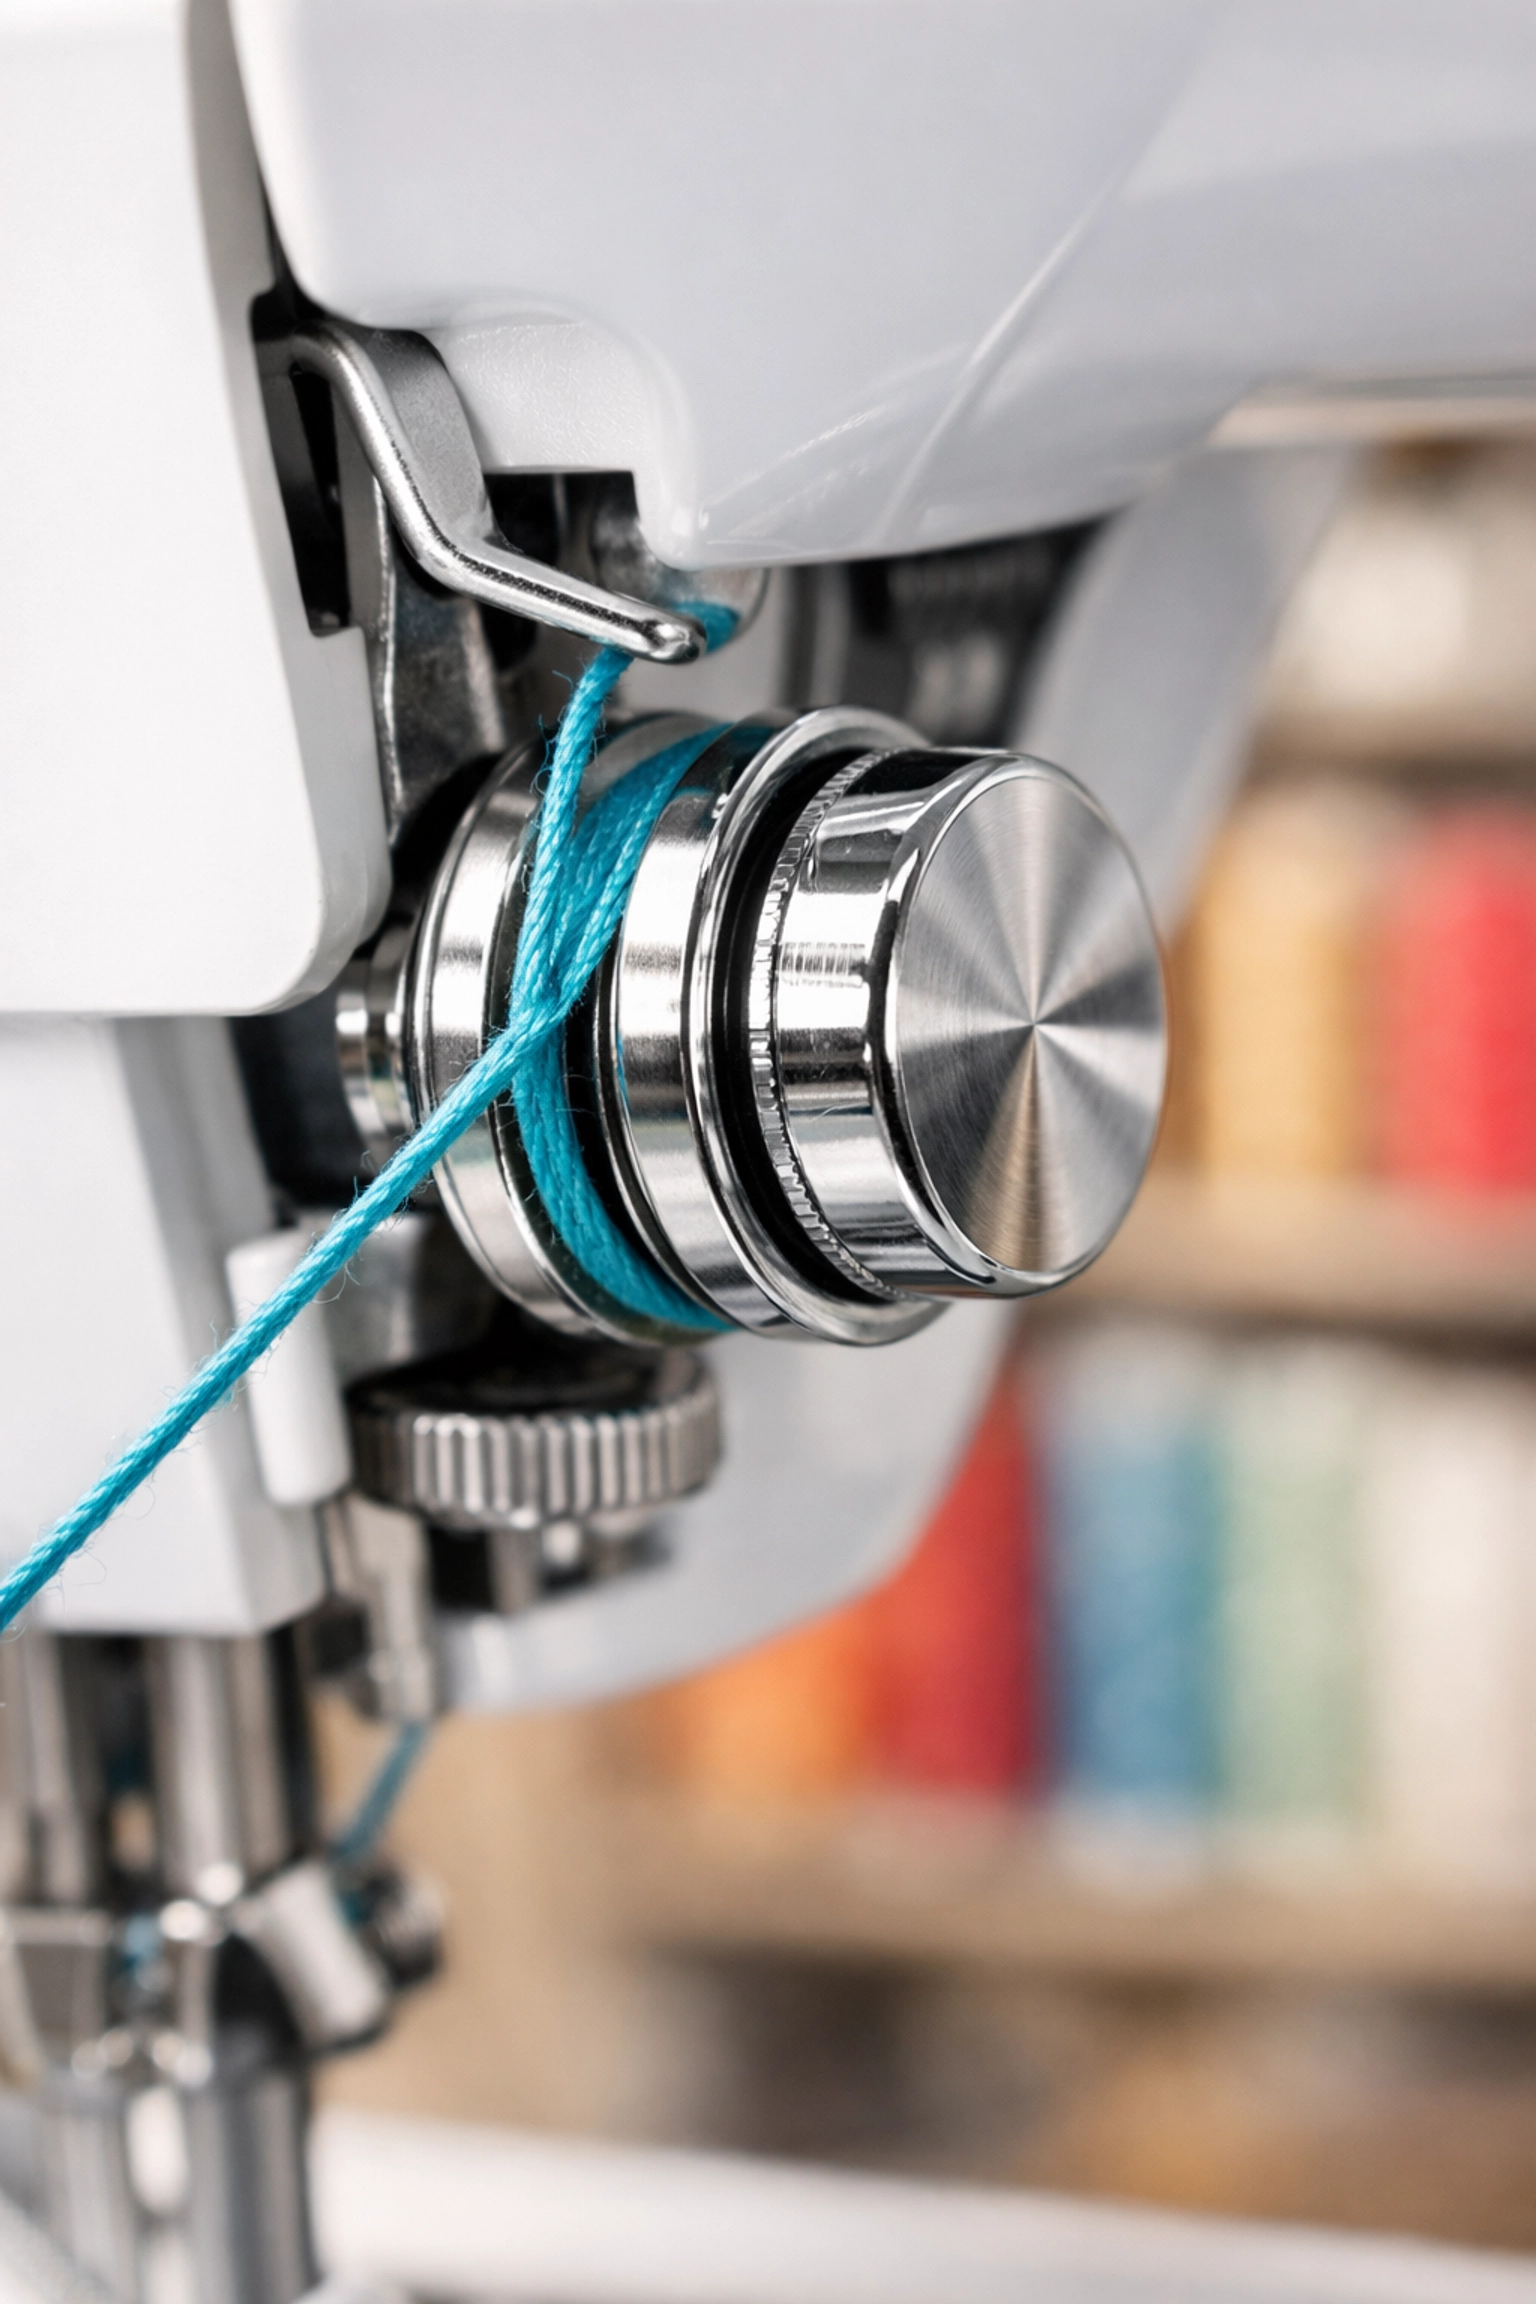
This is easily the #1 mistake we see at Countryside Quilts™. It sounds like a small detail, but it’s the root of about 80% of tension problems.
Inside your sewing machine, there are two small metal discs known as tension discs. When your presser foot is down, these discs are squeezed together tightly to hold the thread while you sew. When your presser foot is up, those discs open. If you thread your machine with the foot down, the thread can’t actually seat itself deep between those discs. It just slides across the top, meaning there is zero tension on your upper thread. The result? A massive mess of loops on the underside of your fabric.
The Fix: Always, always, always lift your presser foot before you start threading the top of your machine. Once the thread is through the discs, you can put the foot down to thread the needle.
We get it: needles aren’t the most exciting part of a project. However, using a dull needle is like trying to cut a steak with a butter knife. It might eventually work, but it’s going to be a mess. Most manufacturers recommend changing your needle after about 8 hours of sewing time.
Furthermore, using the wrong type of needle for your fabric can cause skipped stitches. If you are working on a heavy denim project, a fine "sharps" needle will likely break. Conversely, if you are piecing a delicate quilt top, a heavy-duty needle will leave gaping holes in your fabric.
The Pro Tip: Match your needle to your thread and fabric. If you're working on memory quilts, like the ones we talk about in our Beginner's Guide to T-Shirt Quilts, you’ll definitely want a fresh ballpoint or jersey needle to handle that stretchy knit fabric.
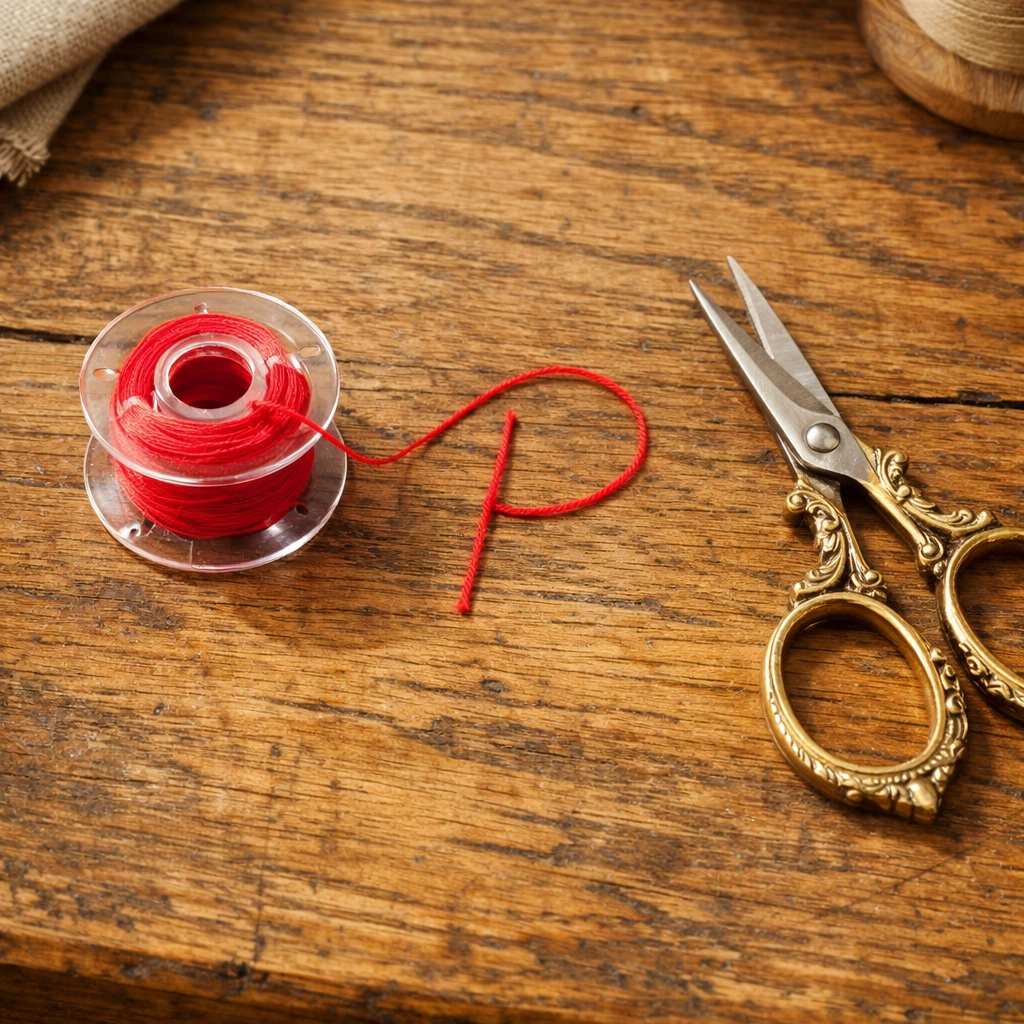
Inserting the bobbin incorrectly is a classic mistake. On most drop-in bobbin machines, the thread needs to come off the bobbin in a specific direction: usually counter-clockwise. A good way to remember this is the "P" rule: when you hold the bobbin up, the thread should come off the left side and go down, forming the shape of the letter "p."
If it looks like a "q," it’s going the wrong way! If the bobbin isn't unwinding correctly, it creates uneven resistance, which throws off your stitch balance.
The Fix: Check your manual or the little diagram usually etched onto the bobbin cover. Ensure the thread is clicked into the bobbin tension spring. If you don't feel a little "click" or resistance when you pull the thread, it isn't in correctly.
We’ve all felt that urge to "help" the machine along, especially when sewing over thick seams. But here’s the secret: your machine has feed dogs (those little jagged metal teeth under the presser foot) for a reason. Their job is to pull the fabric through at the exact speed needed for the stitch length you’ve selected.
When you pull or push the fabric manually, you risk bending the needle. When that needle comes down, it won’t hit the center of the needle plate; it might hit the metal, snap, or: even worse: knock your machine’s timing out of alignment.
The Fix: Guide the fabric, don't pull it. Use your hands only to keep the fabric straight. Let the machine do the heavy lifting.
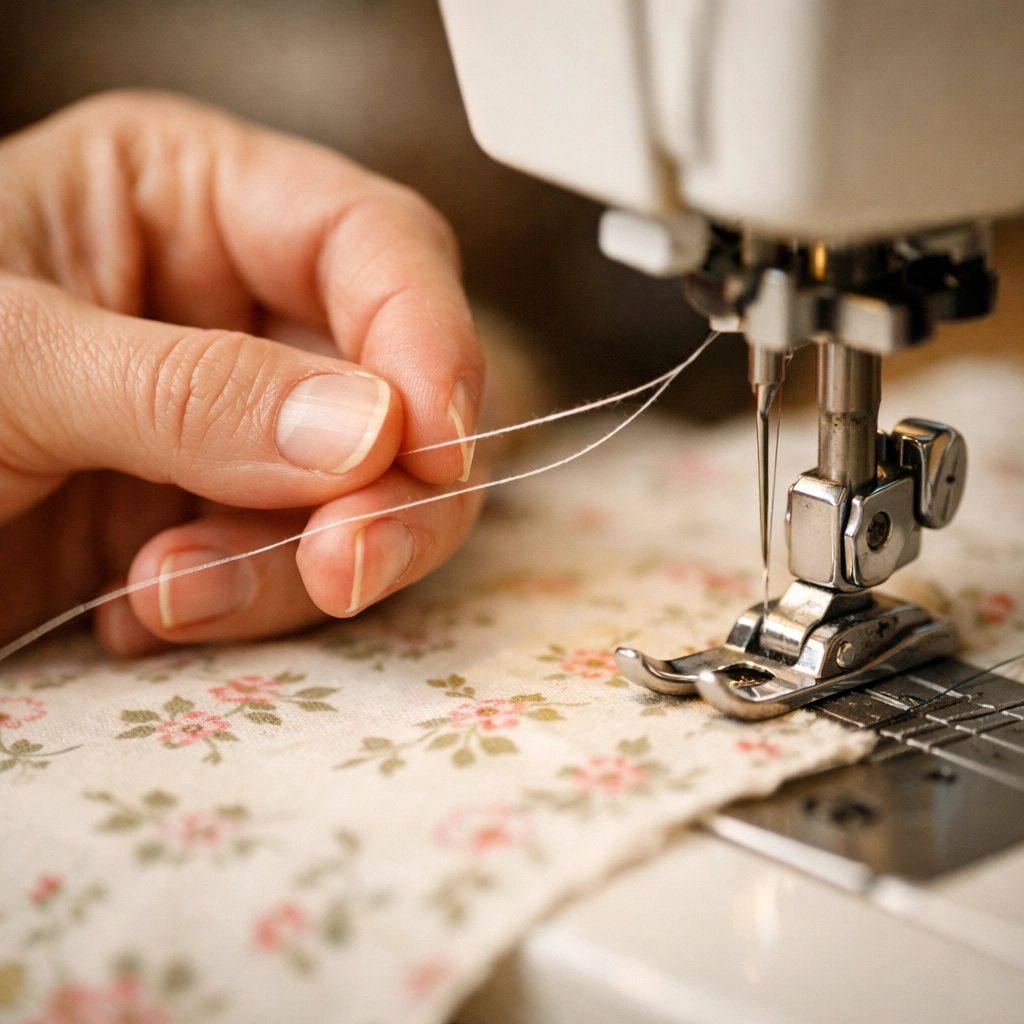
Have you ever started a seam only to have the machine immediately "eat" the fabric or create a knot right at the beginning? This usually happens because the loose ends of your top and bobbin threads get pulled down into the bobbin case by the first few strokes of the needle.
The Fix: Before you take your first stitch, pull about 4-5 inches of thread behind the machine. Hold those two "tails" gently with your left hand for the first two or three stitches. This keeps the thread taut and prevents it from nesting under the needle plate. It’s a small habit that saves a lot of seam ripping!
Fabric is fibrous. Thread is fibrous. When you combine them at high speeds, you get a lot of lint. That lint loves to hide in the bobbin race and under the needle plate. Over time, that lint can soak up the oil in your machine, pack down into a hard felt-like substance, and actually prevent the bobbin from spinning or the feed dogs from moving.
The Fix: Every time you change a bobbin, take a quick second to brush out the lint. Don’t use canned air! Canned air just blows the lint deeper into the gears of the machine where you can't reach it. Use a small brush or a tiny vacuum attachment. If your machine hasn't been professionally cleaned in over a year, it might be time for a tune-up at Countryside Quilts™.
It can be tempting to grab that "5 for $1" thread bin, but your sewing machine will pay the price. Cheap thread is often "hairy" (excessive lint) and has inconsistent thickness. This causes it to catch in the tension discs and break frequently.
Additionally, using a heavy-weight thread in the top and a super fine thread in the bobbin can make balancing your tension nearly impossible.
The Fix: Stick to high-quality brands. At Countryside Quilts™, we always recommend using the same thread in both the top and the bobbin for standard piecing to ensure a balanced, beautiful stitch.
If you’ve checked all the mistakes above and your stitches still look wonky, don't panic. Here is the Countryside Experience Podcast "Instant Tension Reset" guide:
Sometimes, despite our best efforts, a machine just needs a professional touch. Sewing machines are intricate pieces of machinery with hundreds of moving parts. Over time, timing can shift, gears can wear down, and internal components need lubrication that you can't reach from the outside.
At Countryside Quilts™, we pride ourselves on being more than just a retail store. We are a part of your creative journey. If your machine is making a strange clunking sound, skipping stitches no matter what you do, or just hasn't felt "right" lately, bring it in! We offer professional service and repair to get you back to your quilting projects as quickly as possible. You can explore our full range of services and products here.
Sewing should be a relaxing, soulful experience: not a battle with a piece of technology. By avoiding these seven common mistakes, you’ll spend less time troubleshooting and more time creating beautiful quilts that will be cherished for generations.
The Countryside Experience Podcast is all about celebrating the traditions of the countryside and the modern tools that help us keep those traditions alive. We are so grateful to be supported by Countryside General Stores LLC, allowing us to bring you helpful tips and high-quality supplies through Countryside Quilts™.
Happy sewing, and may your bobbins always be full! If you need anything at all, from a new set of fat quarters to a full machine overhaul, come see us at Countryside Quilts™. We can’t wait to see what you make next!
{"one"=>"Select 2 or 3 items to compare", "other"=>"{{ count }} of 3 items selected"}
Leave a comment