You know that drawer? The one stuffed with old concert tees, your kid's sports jerseys, college shirts, and that one vintage graphic tee you can't bear to toss? Yeah, we all have one. But what if I told you there's a way to turn that pile of memories into something you can actually use, a cozy quilt that tells your story?
T-shirt quilts (also called memory quilts) are hands-down one of the most meaningful projects you can make. Whether you're preserving a childhood, honoring a loved one, or just finally doing something with that stack of race shirts taking up closet space, this guide will walk you through exactly how to create your first T-shirt quilt, even if you've never tackled one before.
What Is a T-Shirt Quilt, Anyway?
A T-shirt quilt transforms those favorite old shirts into a functional masterpiece. We're talking about turning sentimental jerseys, vacation tees, band shirts, graduation memorabilia, and more into a quilt that's equal parts cozy blanket and personal scrapbook.
The best part? You don't have to be a quilting expert to make one. With a little prep work, some quality materials from Countryside Quilts™, and patience, you'll have a finished quilt you'll treasure forever.
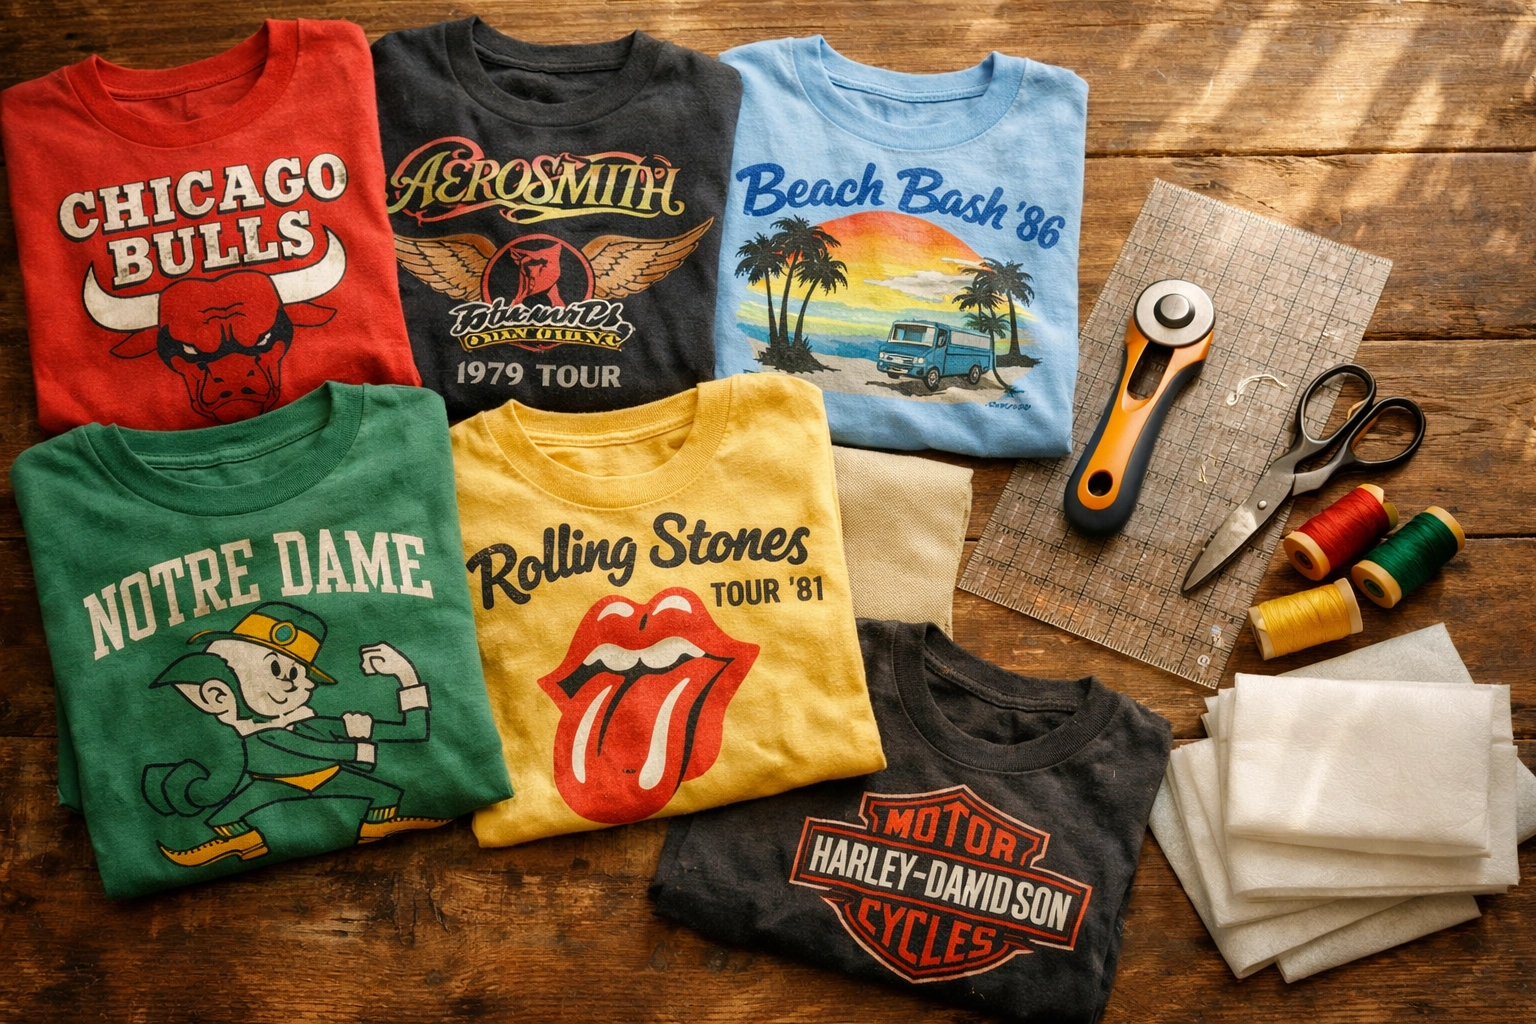
Step 1: Prep Your Shirts Like a Pro
Before you even think about cutting, you need to prep those shirts properly. Trust me on this: skipping this step will haunt you later.
Wash and dry everything. But here's the key: no fabric softener. Fabric softener leaves a coating on the fabric that can mess with your interfacing later. Just use regular detergent, dry them on normal heat, and you're good to go.
Once they're clean, it's time to stabilize. T-shirt fabric is stretchy jersey knit, which sounds great for wearing but is a nightmare for sewing if you don't prep it right.
The Countryside Quilts™ way: if a shirt is thin, we always apply Pellon 9–11 fusible interfacing to the back before cutting. This makes the shirt stronger, helps prevent stretching, and makes the entire sewing and quilting process much easier (seriously—a total game-changer).
From there, you can still use a high-quality lightweight fusible interfacing (also called stabilizer) on the sections you plan to use. Either way, stabilizing stops the fabric from stretching, warping, or puckering while you sew.
The Big Question: How Many Shirts Do You Actually Need?
This is usually the first thing people ask, and honestly, it depends on how big you want your quilt. Here's a handy breakdown:
Lap Quilt (approximately 48" x 60"): 12–16 shirts
Perfect for snuggling on the couch or as a throw for your favorite chair.
Twin Quilt (approximately 63" x 87"): 20–24 shirts
Great for a kid's bed or as a meaningful college send-off gift.
Queen Quilt (approximately 84" x 92"): 30–35 shirts
This is the "go big or go home" option. Ideal if you've been hoarding shirts for years.
Keep in mind these numbers assume you're using the front graphic of each shirt. If you're also using the backs (some shirts have cool designs on both sides), you can stretch fewer physical shirts into more quilt blocks.
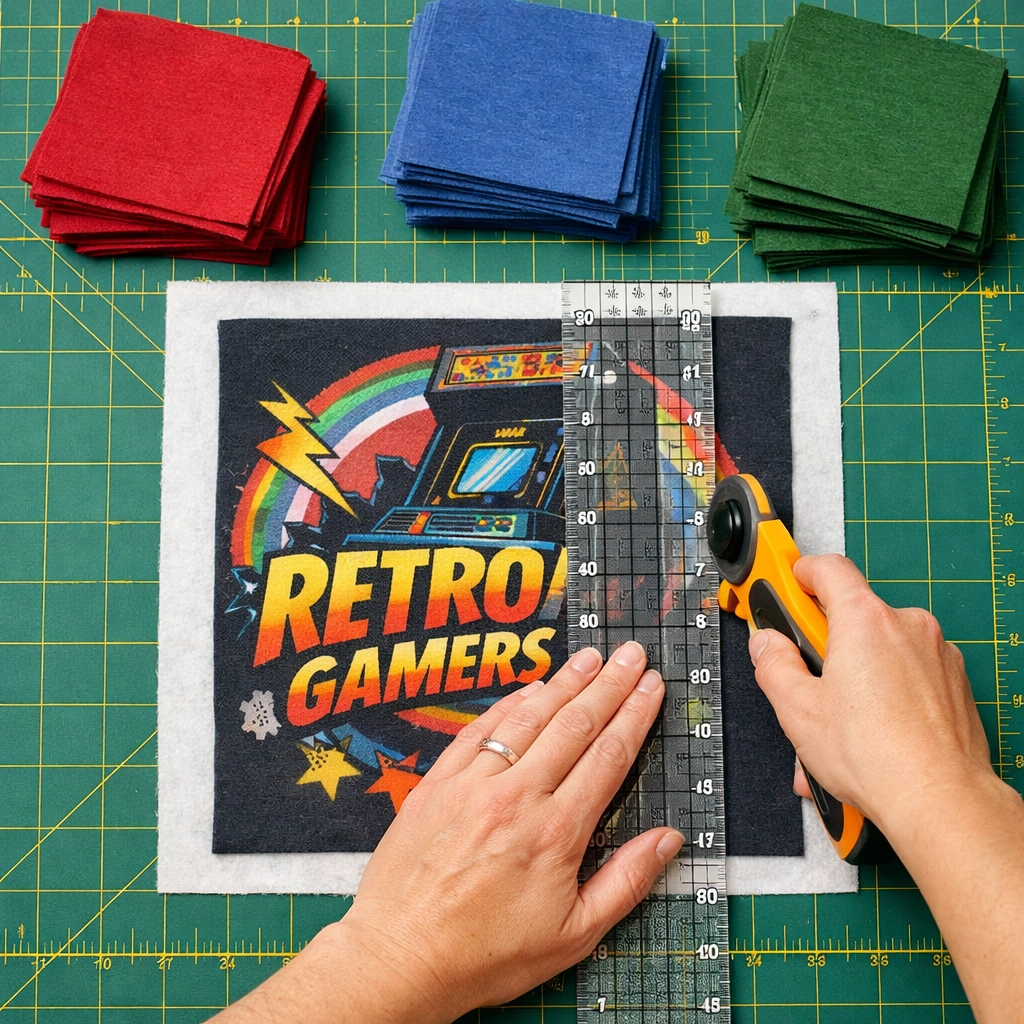
Step 2: Cut Your Blocks
Once your shirts are prepped and stabilized, it's time to cut. Use a rotary cutter, clear quilting ruler, and cutting mat for the cleanest, most accurate cuts. Scissors can work, but they're slower and less precise.
For beginners, I recommend sticking with squares or rectangles. Cut each shirt graphic into uniform blocks: most people go with 12" x 12" or 14" x 14" squares. Keeping everything the same size makes piecing your quilt top together so much easier.
Cut around the design you want to feature, leaving a little breathing room. You can always trim down later, but you can't add fabric back.
Step 3: Get Creative with Sashing and Borders
Here's where your T-shirt quilt goes from "cool DIY project" to "wait, that's actually gorgeous." Sashing is the fabric strips you place between your T-shirt blocks, and borders frame the whole quilt.
This is your chance to tie everything together with high-quality quilting fabrics. At Countryside Quilts™, we've got tons of coordinating solids, prints, and textures that can make your quilt look cohesive: even if your T-shirts are a wild mix of colors and styles.
Try a neutral like gray, cream, or black for sashing if your shirts are super colorful. Or go bold with a pop of color that appears in several of your shirts. There's no wrong answer here: just have fun with it.
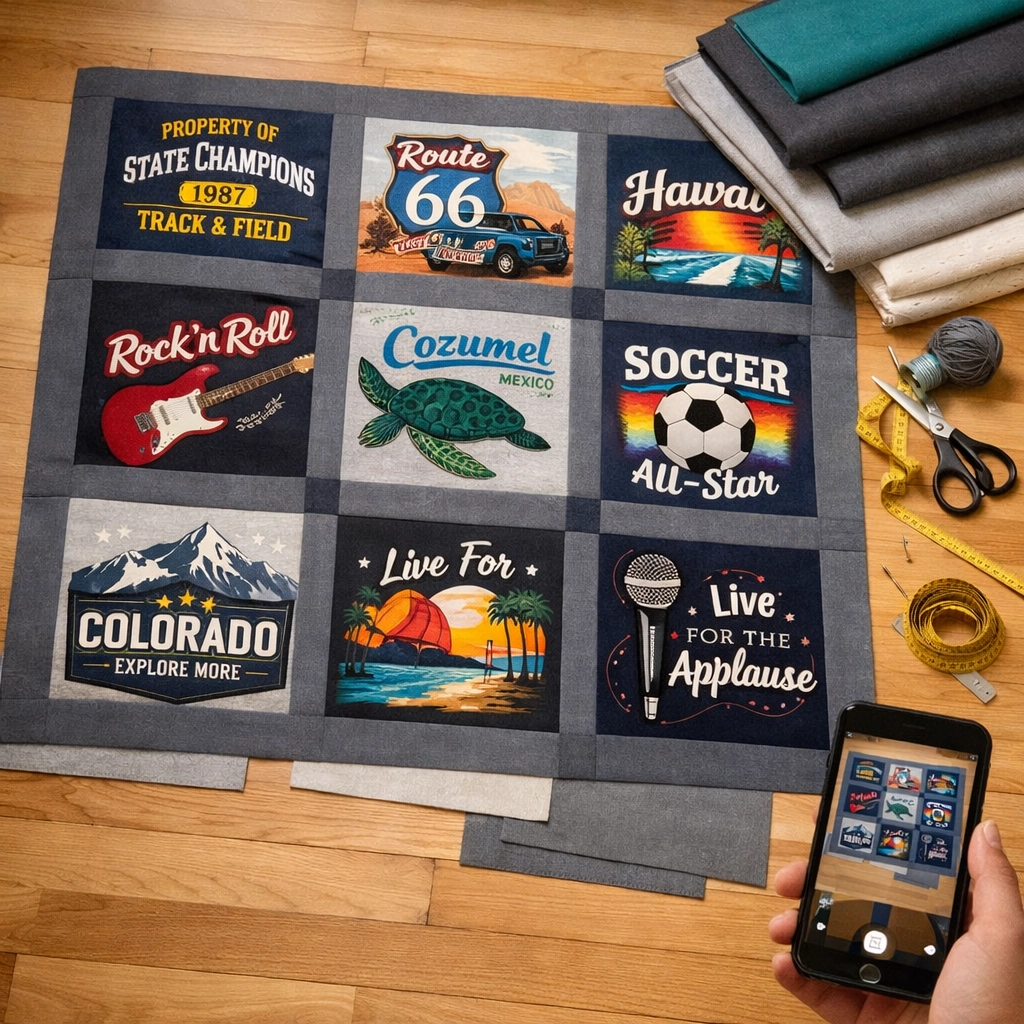
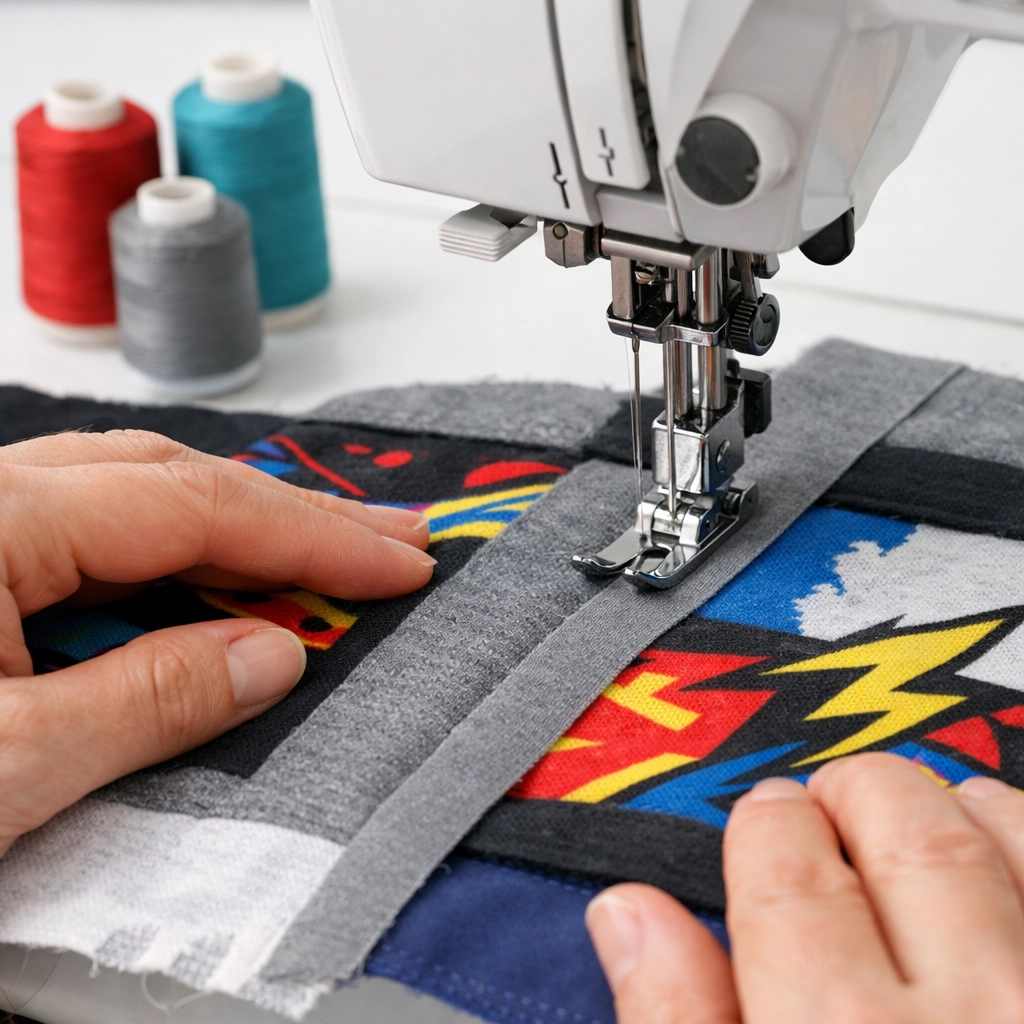
Step 4: Piece It All Together
Layout time! Before you sew anything, arrange your blocks on the floor or a design wall. Move them around until you find a layout you love. Take a picture with your phone so you don't forget the arrangement.
When you're ready to sew, work in rows. Sew your blocks together horizontally (with sashing strips in between if you're using them), then sew the rows together vertically. Press your seams open as you go to keep everything flat and neat.
If you're adding borders, measure carefully and attach them last. Borders are like the frame on a painting: they finish the whole look.
Step 5: Finishing Touches (aka the Fun Part)
Once your top is pieced, you've got a few options for finishing:
-
Bring it to us. Seriously. Countryside Quilts™ in Missouri offers professional longarm quilting services that will give your T-shirt quilt that heirloom-quality finish. Our team can add beautiful quilting designs that hold all the layers together and make your quilt look polished and professional.
-
DIY quilting. If you want to quilt it yourself at home, you'll sandwich your quilt top, batting, and backing together, then quilt through all three layers. This works well for smaller quilts, but larger ones can be tough to wrangle on a home machine.
-
Tie it. For a super casual finish, you can tie your quilt at regular intervals with embroidery thread or yarn. It's fast, easy, and gives a cozy, homespun vibe.
Once it's quilted, add binding around the edges and you're done!
Tips for First-Timers
Don't stress about perfection. This is a memory quilt. A few wonky seams or slight size differences won't ruin it: they'll make it uniquely yours.
Start smaller if you're nervous. A lap quilt with 12–16 shirts is way less intimidating than a queen-size project. You can always make another one later.
Label it. Add a label to the back with your name, the date, and what the quilt represents. Future generations will thank you.
Use quality materials. Cheap batting and backing fabric can make your quilt feel stiff or wear out faster. We've got everything you need at Countryside Quilts™: batting, backing, coordinating fabrics, and all the notions.
Why T-Shirt Quilts Are Worth the Effort
Here's the thing: T-shirt quilts aren't just quilts. They're time capsules. They're hugs. They're stories stitched together with thread and love.
Maybe it's a quilt for your high schooler heading off to college, made from all their athletic jerseys and club shirts. Maybe it's a memorial quilt honoring someone you lost. Maybe it's just a way to finally deal with that drawer of shirts you can't let go of.
Whatever your reason, making a T-shirt quilt is one of those projects that feels hard at first but becomes so rewarding once you see it come together.
And remember, you're not alone in this. The team at Countryside Quilts™: brought to you by Countryside General Stores LLC: is here to help. Whether you need supplies, advice, or professional finishing services, we've got you. We're all about supporting makers like you, and we'd love to be part of your memory quilt journey.
So grab those shirts, fire up your iron, and let's turn those memories into something you can wrap yourself in. You've got this. 🧵❤️


Leave a comment